
Whether you’re jotting notes, redlining design plans, or marking up a contract, using an Apple Pencil on your iPad should be as easy and feel like writing on paper. And with the right setup, it is.
The challenge is figuring out what that setup looks like for you. Apple Pencil models vary in what they support, and Apple's built-in Markup tool may not be enough if you need more than basic sketching and highlighting.
This guide covers Pencil compatibility, what native Markup handles well, and where dedicated tools like Drawboard PDF fill the gap for users who need pressure-sensitive ink, measurement tools, and reusable markups across all their devices.
Note: Most workflows in this guide assume an iPad running a current version of iPadOS paired with an Apple Pencil. If you are choosing a Pencil for PDF markup, check compatibility before you buy one.
Apple Pencil changes how PDF markup feels as soon as documents get technical. Finger input works for simple highlighting, but it lacks the precision to place a note accurately on a dense drawing or write legibly in a small comment box.
The Pencil fixes that: low-latency tracking keeps ink where you intend it, pressure sensitivity lets you vary line weight the way you would with a real pen, and palm rejection means you can work through a long review session without babying your hand position.
Not every model delivers all of that, and not every Apple Pencil works with every iPad. Before you buy, confirm your devices work together the way you need them to.
The biggest difference for PDF annotation is pressure sensitivity. Apple Pencil (USB-C) supports precise, low-latency writing and tilt recognition, but stroke thickness remains uniform regardless of how hard you press.
If you want lines that respond to pressure, you'll need Apple Pencil Pro, Apple Pencil (2nd generation), or Apple Pencil (1st generation) paired with a compatible iPad and an app that supports it.
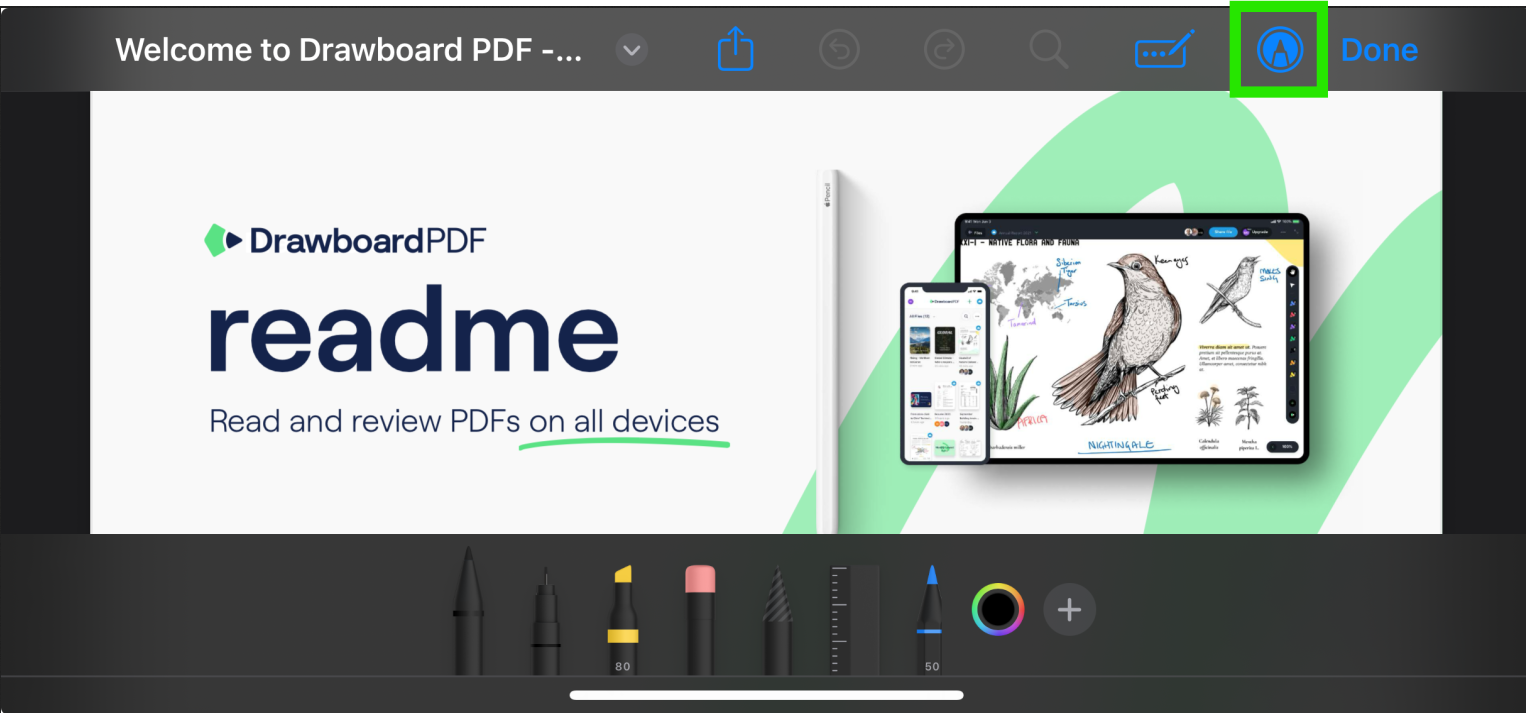
Apple's Markup tool is built into iPadOS and available across Files, Notes, Mail, and most document previews without any additional setup. It covers the basics well, including basic signing, highlighting, handwritten notes, and simple sketching.
If you only work with PDFs occasionally and want a free, built-in option, here's how to use Markup on your iPad.
Start by opening the PDF in an app that supports Markup. Files is the most direct option for documents saved locally or in iCloud Drive, while Notes and Mail work well when the PDF already lives inside a note or message.
The Markup Toolbar is where you'll find all of Apple's annotation tools, including pens, highlighters, erasers, color controls, and selection tools. If it gets in the way while you're working, you can move it to another edge of the screen or temporarily collapse it.
Use the native Markup tools when you need fast handwritten notes or a few arrows on a PDF, or want to highlight important sections. The Pen, Marker, Pencil, and Highlighter tools all work with Apple Pencil, and the color controls let you separate review notes by topic or priority.
Native Markup gives you a few quick correction tools, which are helpful when handwritten notes land in the wrong place or a line crosses the wrong part of a drawing.
Save behavior depends on where the PDF is open:
If you've spent a lot of time annotating a document, it's worth reopening the PDF before moving on. A quick check can help you catch sync issues or confirm that your highlights, notes, and drawings were saved to the correct file.
Apple's Markup tool works well for light annotation. If you need to sign a document, circle a section, add a quick note, or highlight a few passages, you can do it directly from the apps already built into iPadOS. For occasional PDF work, that's often all you need.
The limitations become more noticeable when you're working with PDFs every day. If you review PDFs every day, reuse the same symbols, measure construction drawings, organize annotation sets, or move between iPad, iPhone, Mac, and web, a dedicated PDF markup tool gives you more control.
Drawboard PDF for iPad and iPhone is built for people who want a more complete markup workflow than Apple's native tool provides. The iPad app keeps the familiar pen-on-paper feel, then adds a full Markup Toolbar, reusable markups, measurement tools, signing, and Store+Share sync. Here’s how it works.
Spend a few minutes setting up Drawboard PDF before you start reviewing documents. Getting your account, sync settings, and preferred tools configured upfront makes the actual markup process much smoother.
If you plan to use reusable markups or measurement tools, confirm that your plan includes the features you need on the Drawboard pricing page.
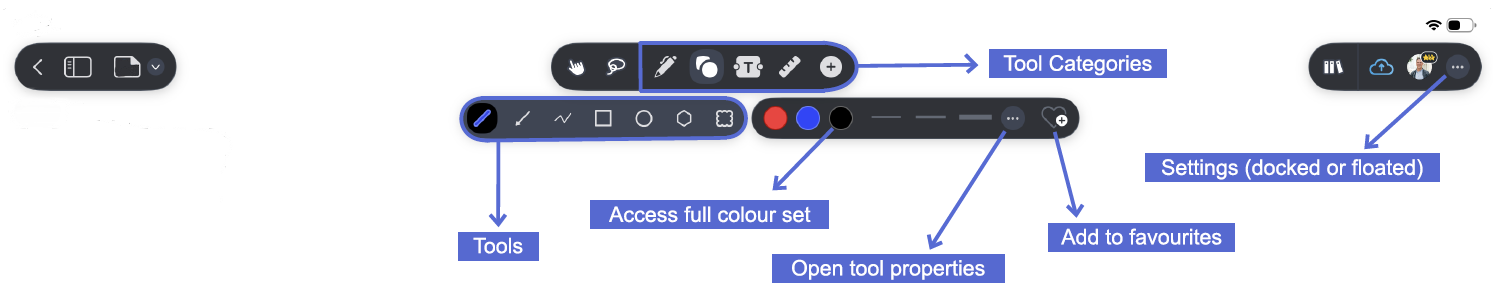
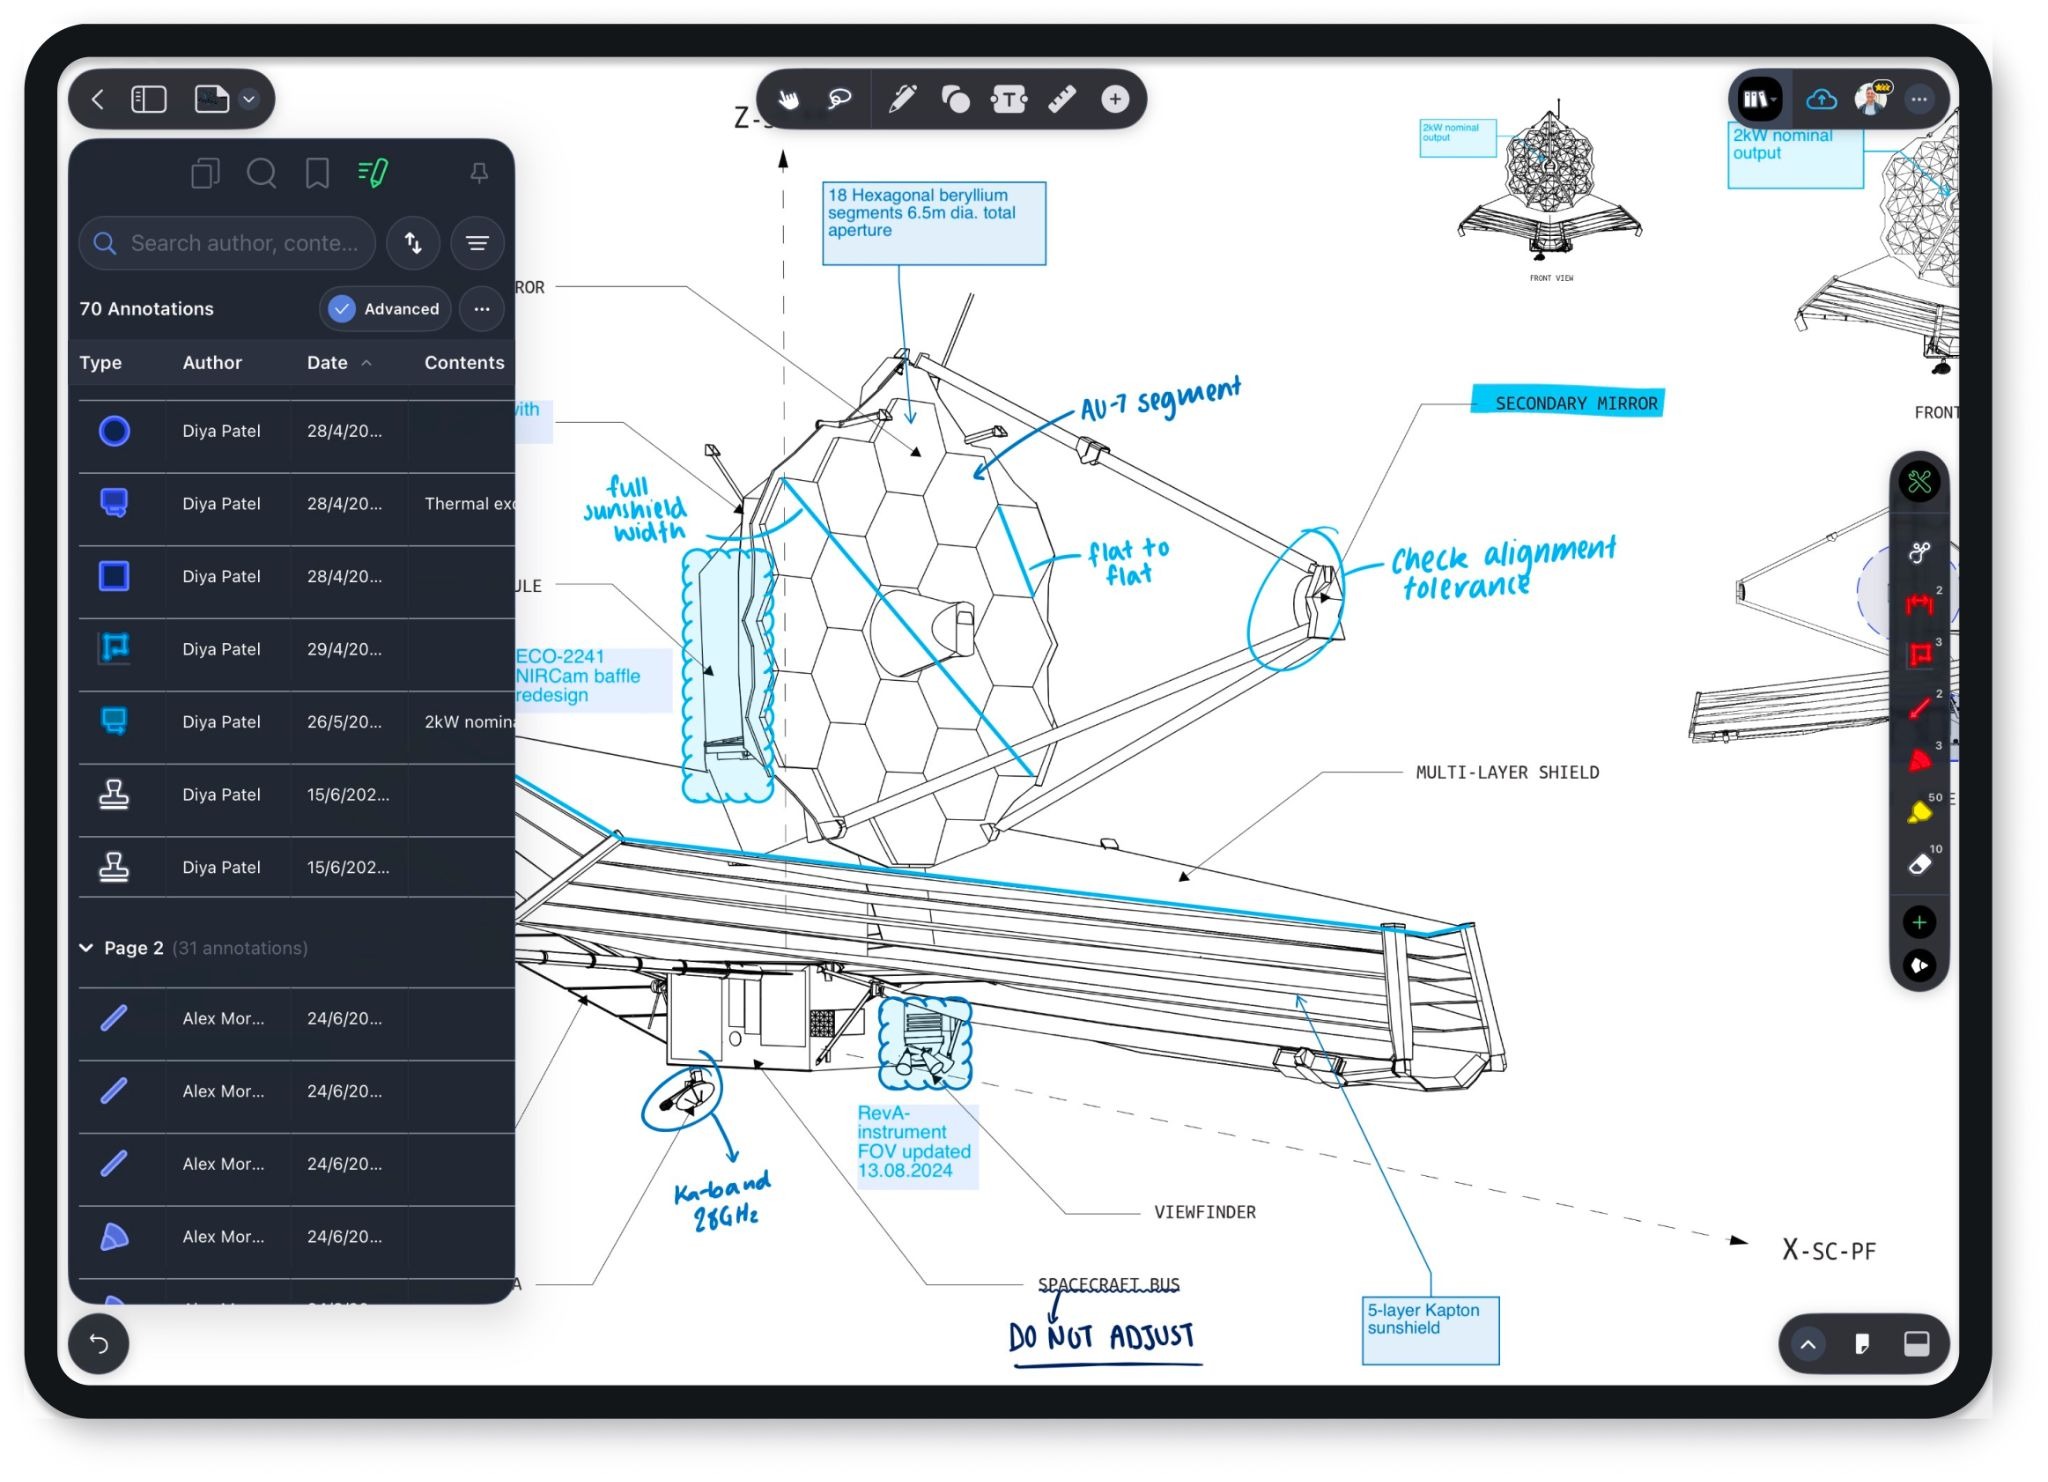
The Markup Toolbar is where most of your work starts in Drawboard PDF. Whether you're handwriting notes, reviewing drawings, adding measurements, or filling out forms, the tools you need are organized in one place so you can switch between them without leaving the document.
Here’s how you can use the toolbar:
Once the toolbar is open, you can:
For drawing-heavy sessions, use the three dots in the top-right corner to choose Viewing Mode, then switch between Docked and Floating. Floating mode lets you move the toolbar around the canvas, while Docked mode keeps it fixed to the top of the screen.
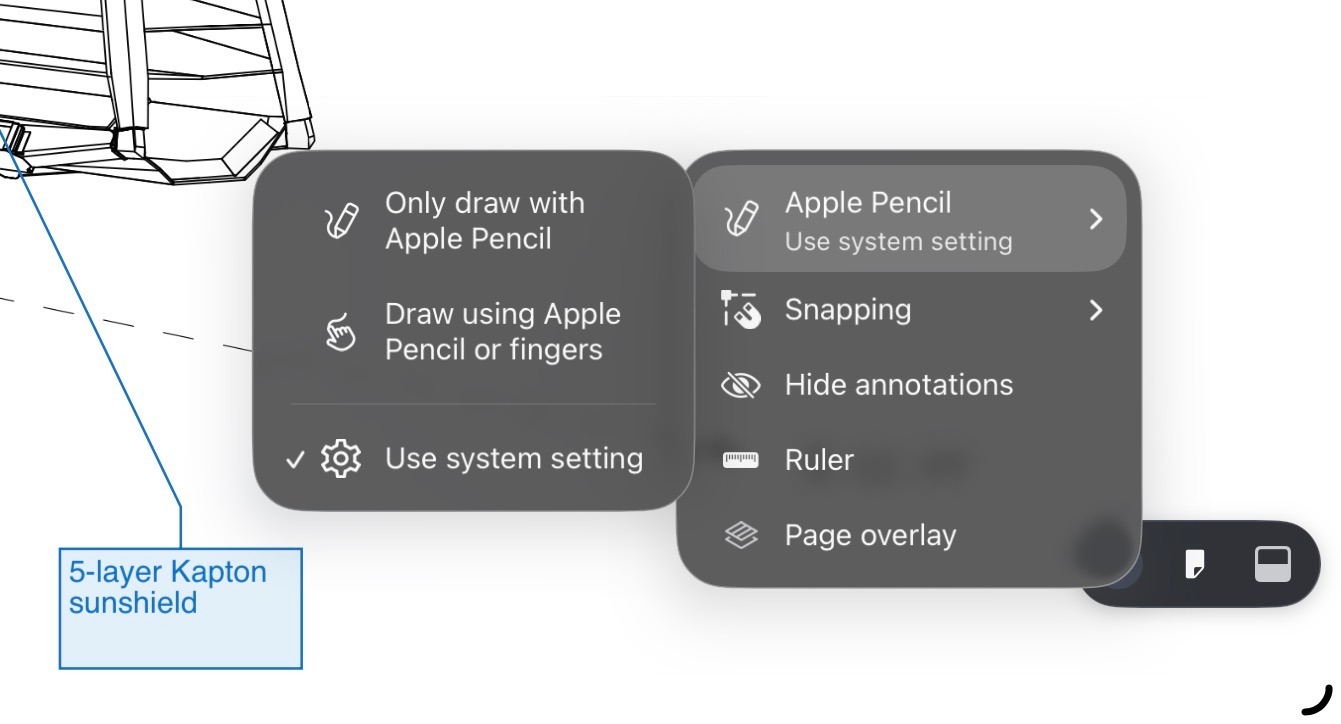
Apple Pencil settings help you separate drawing from navigation. If you want your Pencil to mark up the PDF while your finger scrolls, turn off touch annotation unless you specifically need finger markup.
For the cleanest Pencil workflow, choose Only Draw using the Apple Pencil, so your finger can scroll without adding stray ink.
You can also set this at the iPad level by opening Settings, choosing Apple Pencil, and turning on Only Draw with Apple Pencil. Drawboard's stylus and touch settings explain both options.
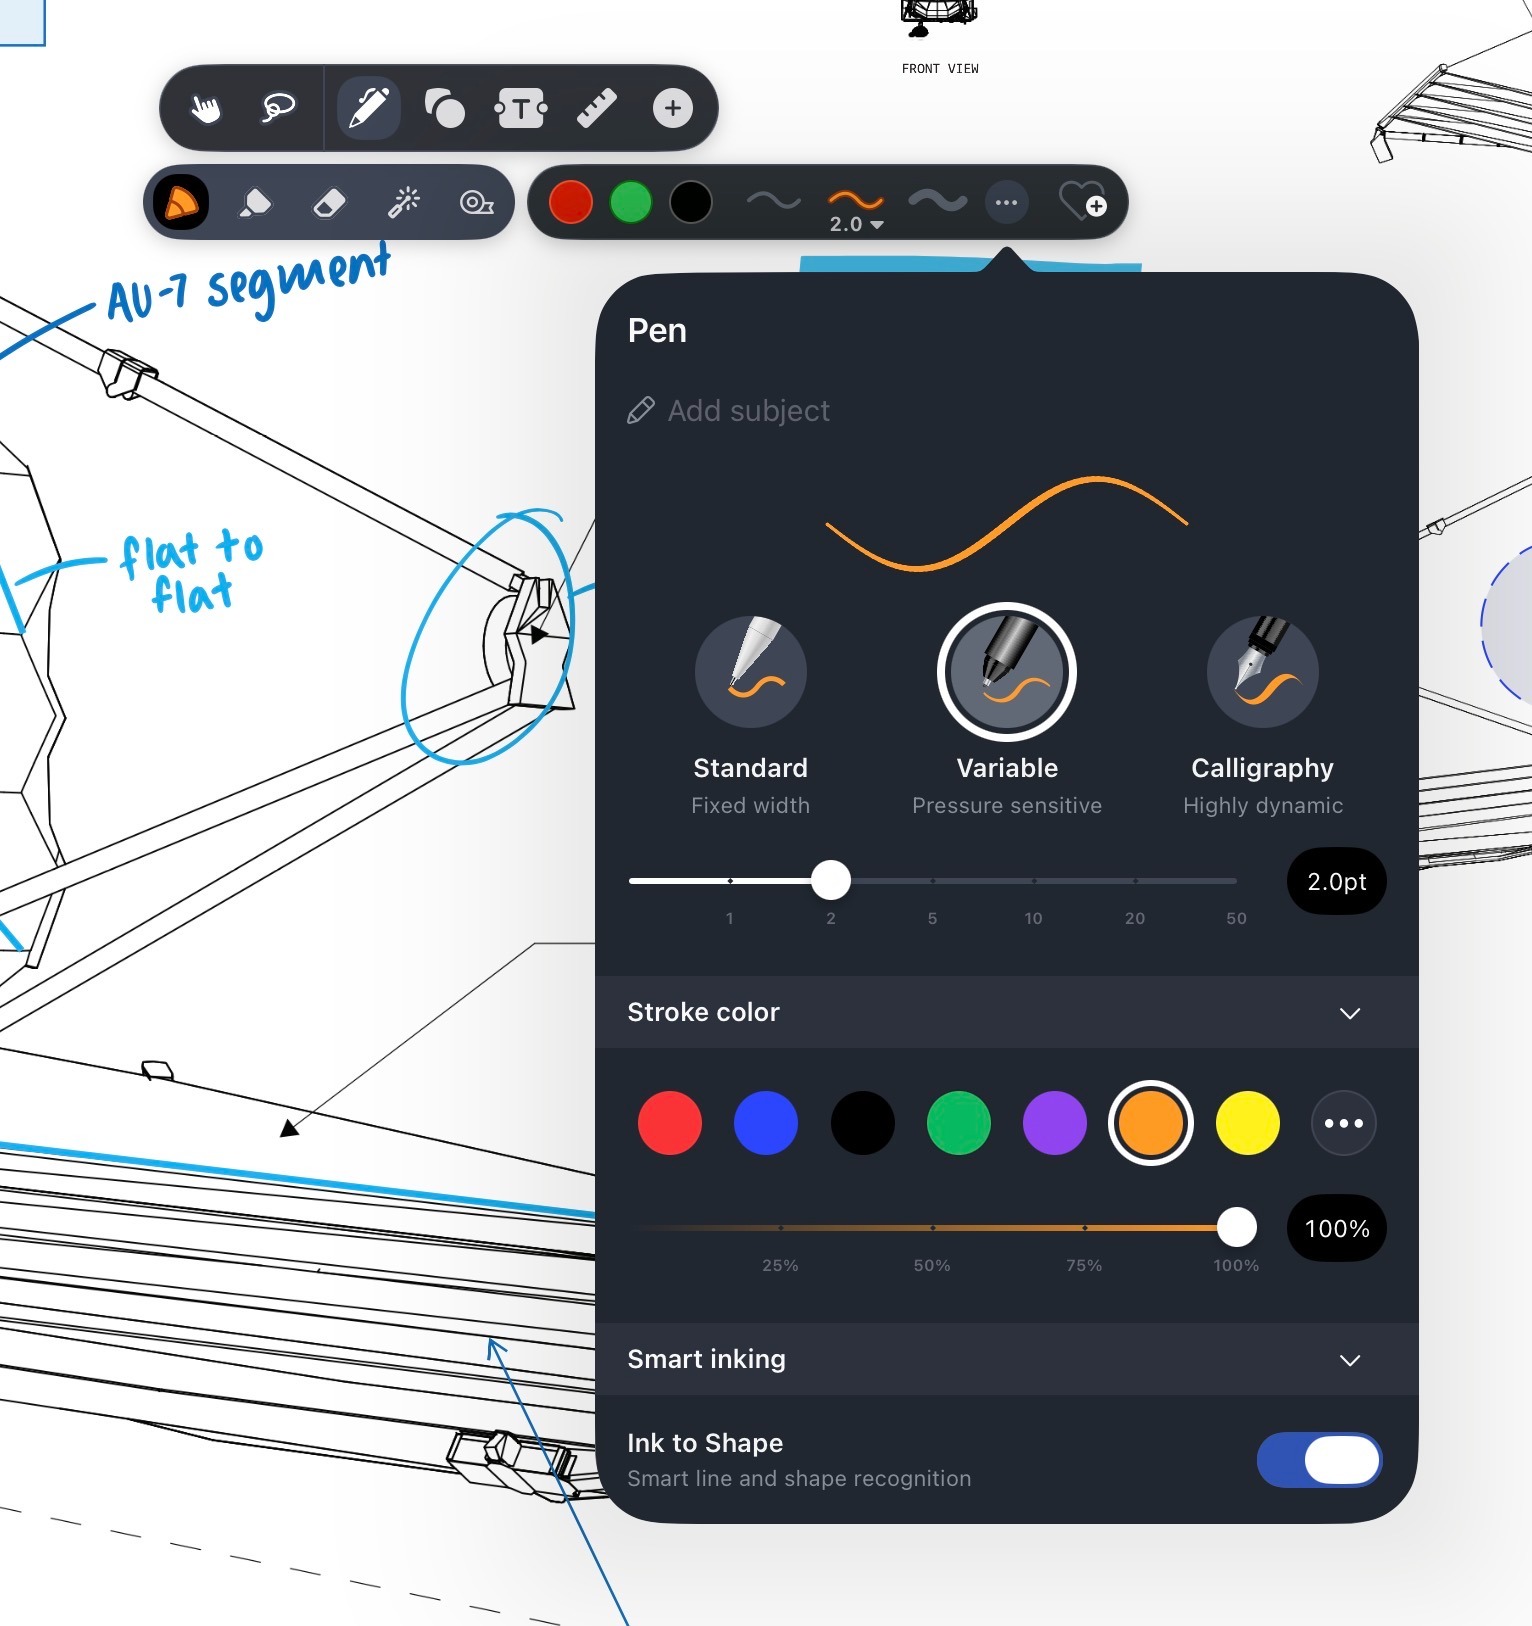
If you use Apple Pencil regularly, pressure-sensitive ink is one of the first differences you'll notice in Drawboard PDF.
The Pen tool on the iOS app includes several pen styles, including Standard, Variable, and Calligraphy, but Variable is the one that feels closest to writing with a real pen. With Variable ink, a light touch produces a thinner line, while more pressure creates a heavier stroke.
This is where your hardware matters. Apple Pencil (USB-C) gives you precise ink without the dynamic stroke weight. For the full pressure-sensitive feel, use a compatible Apple Pencil model that supports pressure.
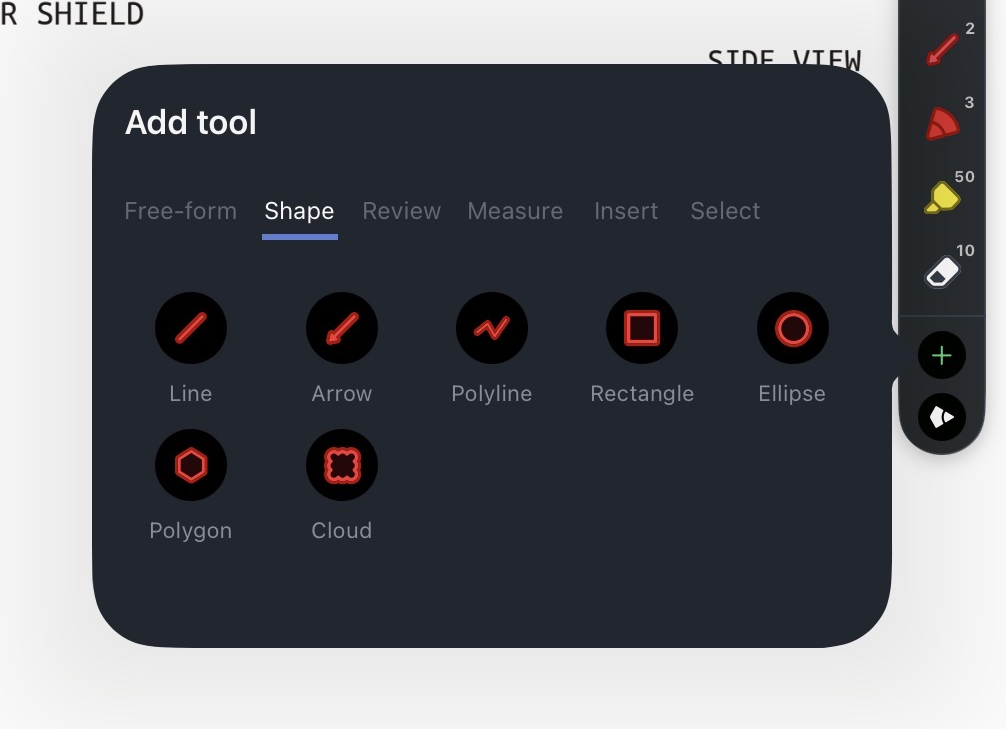
Use shapes and review markups when handwriting alone is too easy to miss. Arrows, clouds, callouts, underlines, and strikethroughs give reviewers a clearer way to point to a specific line, note, issue, or dimension.
Here’s how you can do this on Drawboard PDF:
For architecture, engineering, and construction workflows, the Measure tools can turn the iPad into a field-ready review setup. Use Calibrate first, then apply Measure Length, Poly length, Polygon area, or Rectangle area to check dimensions on a construction drawing.
For more information, check out our guide to measurement and angles article.
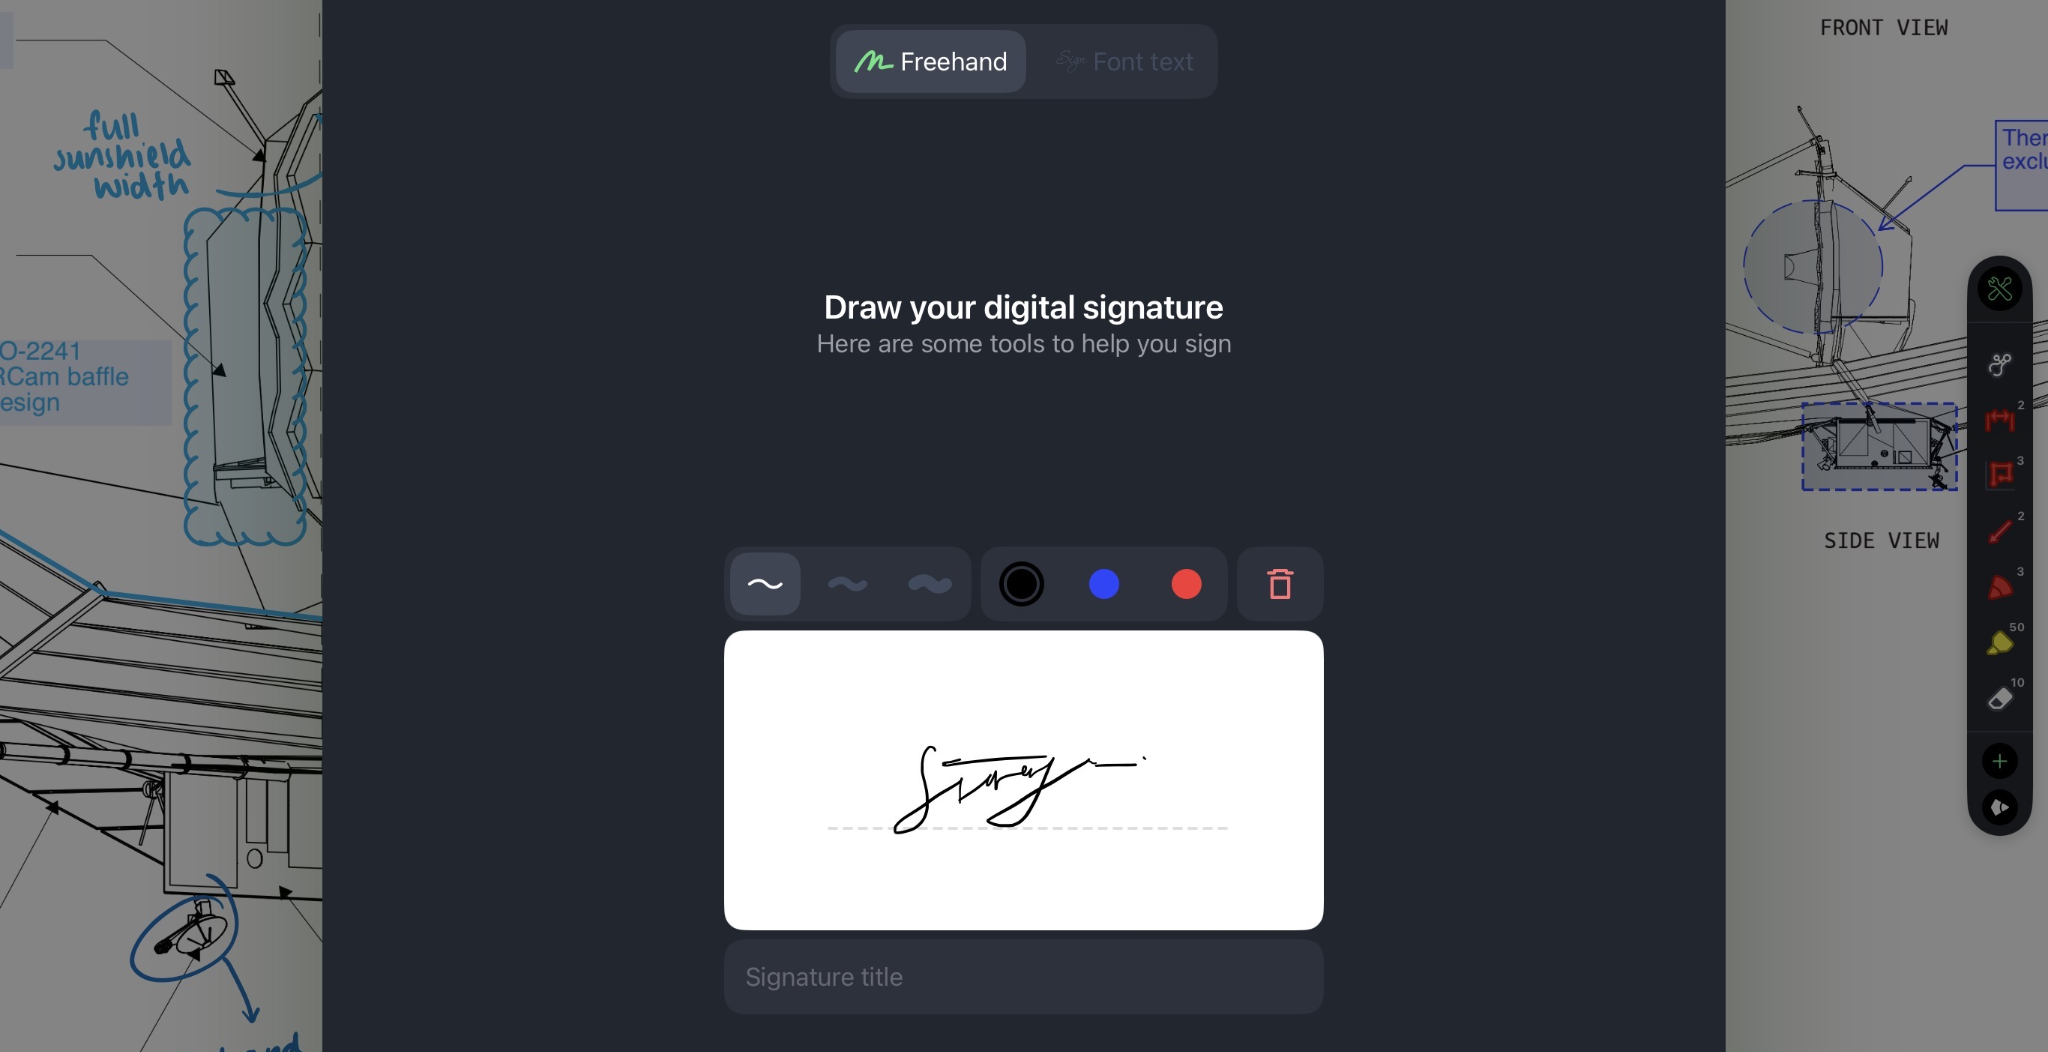
Apple Pencil is a natural fit for signatures because you can write directly on the PDF. Drawboard PDF supports signing workflows through its Signature tool, with stored signatures available based on your plan.
1. Open the PDF you need to sign.
2. Choose the Signature tool from the Insert tools.
3. Draw your signature with Apple Pencil or choose a saved signature if you already have one.
4. Place the signature in the correct field, then resize or reposition it as needed.
For a full walkthrough, here’s how to fill and sign a PDF.
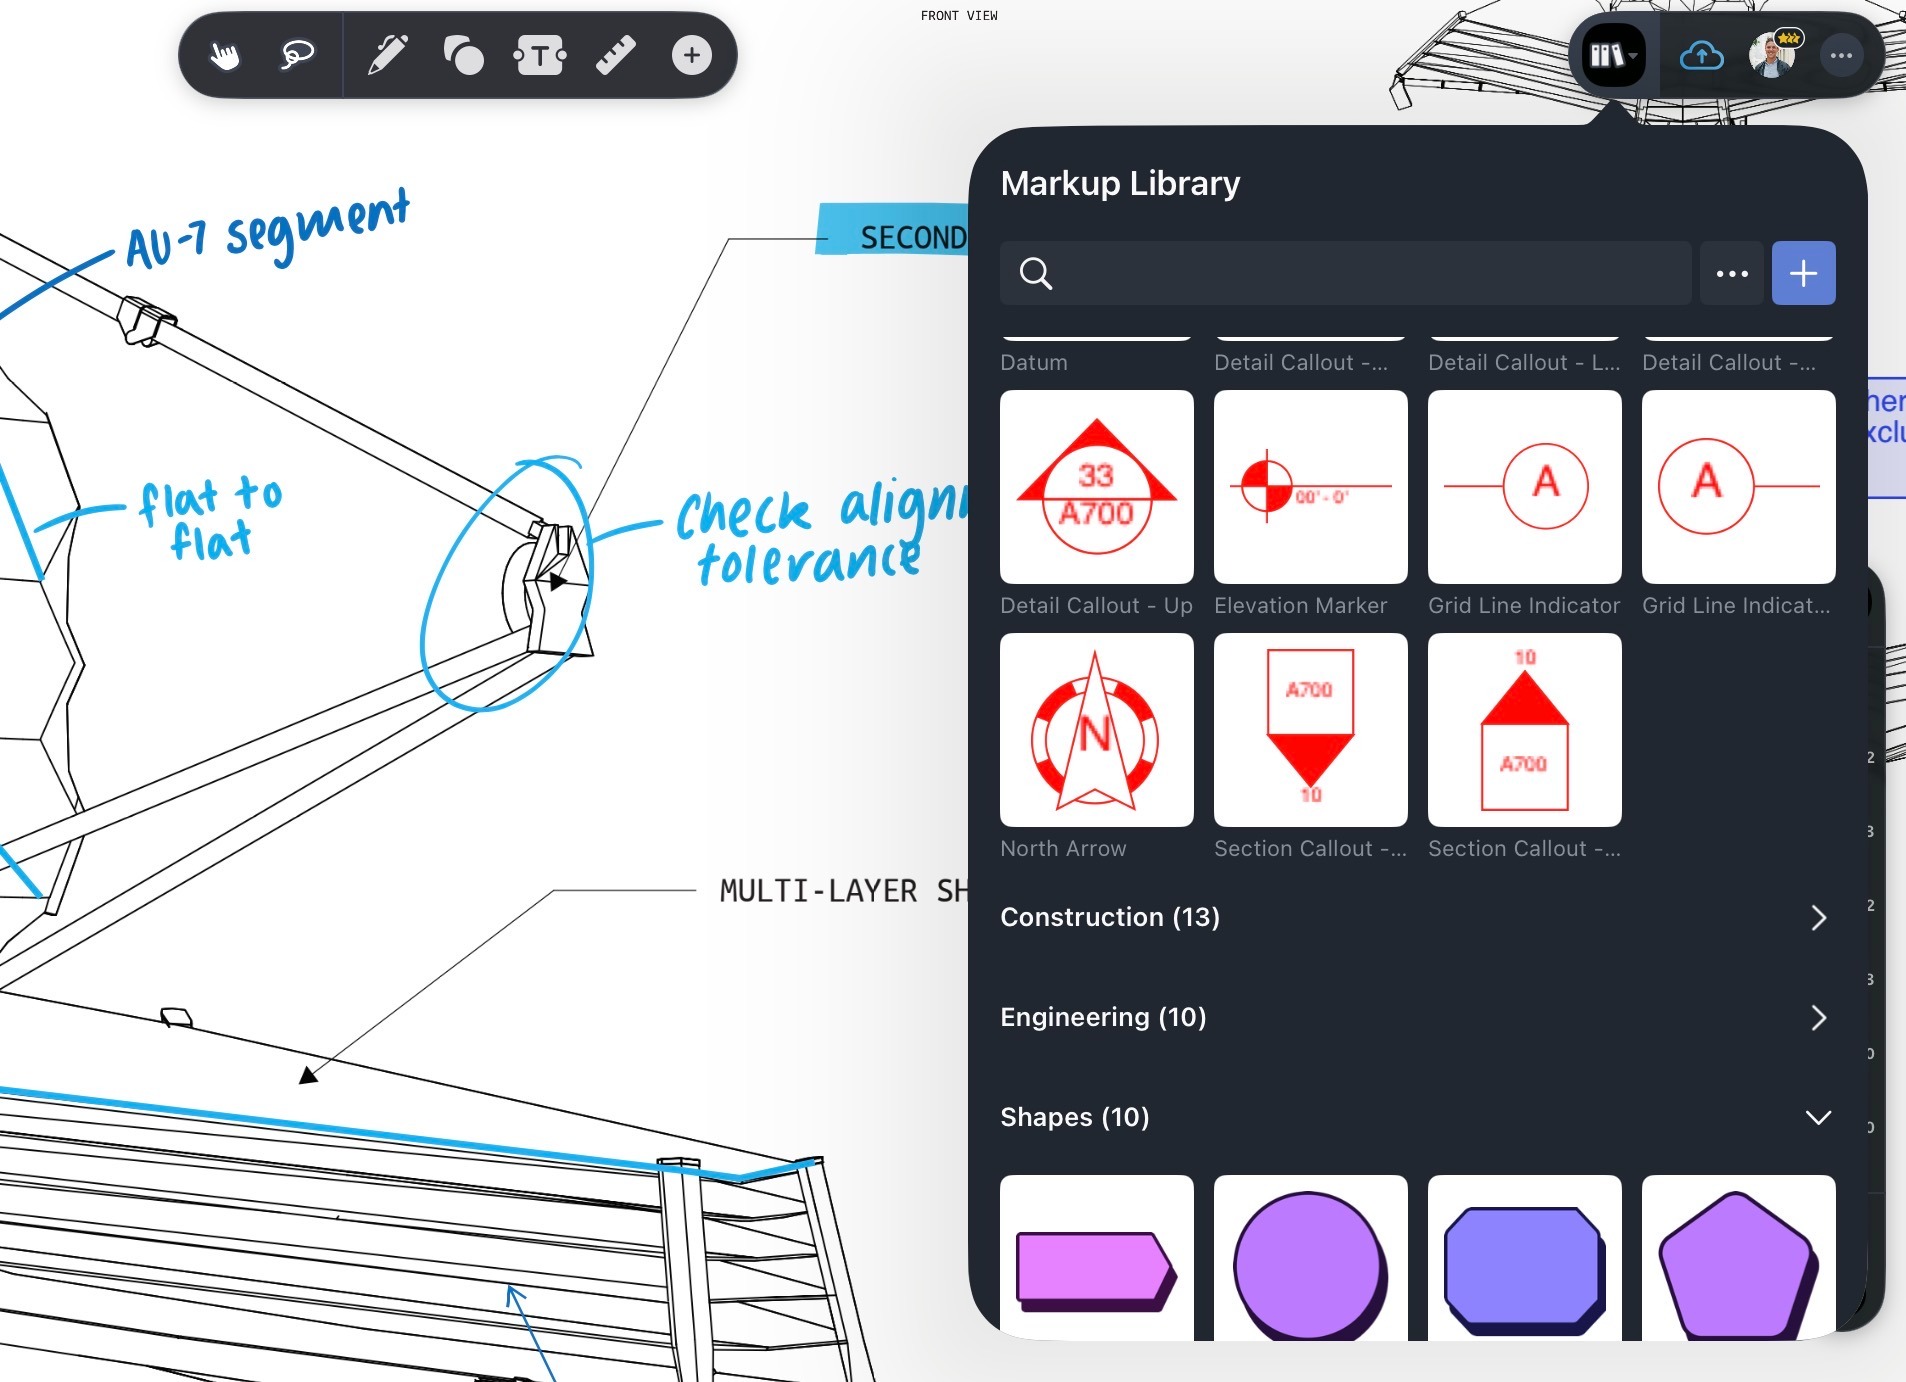
If you find yourself adding the same annotations, shapes and lines, text annotations, or callouts over and over, the Markup Library can save you time.
Instead of recreating reusable markups for every document, you can save them once and reuse them across PDFs on iPad, Windows, macOS, and the web. Here’s how it works:
1. Use the Select tool to select the annotation you want to save.
2. When the options panel appears, tap Add on iOS.
3. Open the Markup Library when you want to reuse the saved markup on another PDF.
4. Use tags, sorting, and grouping to keep frequently used markups easy to find.
AEC reviewers can use this for project notes, review stamps, engineering symbols, and repeated drawing comments. Save the markup once, then drop it back onto the next drawing when the same issue appears.
If you switch between devices throughout the day, Store+Share keeps your PDFs and annotations available wherever you left off. You can mark up a PDF on iPad, review it later on Mac or in a browser, and keep your document connected to the same cloud workspace.
1. Save the PDF in Drawboard PDF with Store+Share enabled.
2. Open Drawboard PDF on another supported device.
3. Open the same document from your account.
4. Continue reviewing, adding markups, or sharing from that device.
This is helpful when an iPad works best in the field, while a desktop screen works better for final review. Your team gets a marked-up PDF that can move with the work across iPad, iPhone, Mac, and web.
A few small settings can make PDF markup on iPad much more comfortable, especially during longer review sessions.
Before you spend an hour annotating a document, it's worth checking how Pencil input, save behavior, and workspace settings are configured.
Turn on Only Draw with Apple Pencil if you want to annotate with the Pencil while using your fingers to scroll through the document. This prevents accidental finger strokes while your hand moves around the PDF, especially on long drawings or multi-page documents.
Drawboard PDF for iOS saves versions of documents as you work. If you are working with cloud sync, give the document a moment to finish syncing before you close the app or move to another device.
If your internet connection drops, you can continue working on the document locally and let it sync once you're back online. The app itself doesn’t require an internet connection, so you can continue reviewing and annotating PDFs when the internet drops. This is helpful when you're working on-site or moving between locations with unreliable connectivity.
If you need more screen space while annotating, Drawboard PDF can automatically hide parts of the interface as you draw using the Floating mode.
To activate it, open the additional options from the three-dot menu in the top-right corner and enable Hide Markup Toolbar While Drawing or Hide Properties While Drawing. This gives you more room to work while keeping the toolbar easily accessible when you need it.
Apple Pencil makes marking up PDFs on iPad feel far more natural than tapping through documents with your finger. For occasional annotations, Apple's built-in Markup tools handle the essentials without much setup.
If PDF review is something you do regularly, a dedicated app like Drawboard PDF can make the process faster and more organized with a full Markup Toolbar, measurement tools, Store+Share sync, and pressure-sensitive ink.
The free Basic plan is a good starting point if you want to try Drawboard PDF alongside Apple's built-in tools. As your markup needs grow, whether that's reviewing drawings or managing more complex PDF workflows, you can explore the Pro plans to see what you’re missing out on.
Get started free with Drawboard PDF for iPad.
Whether you’re jotting notes, redlining design plans, or marking up a contract, using an Apple Pencil on your iPad should be as easy and feel like writing on paper. And with the right setup, it is.
The challenge is figuring out what that setup looks like for you. Apple Pencil models vary in what they support, and Apple's built-in Markup tool may not be enough if you need more than basic sketching and highlighting.
This guide covers Pencil compatibility, what native Markup handles well, and where dedicated tools like Drawboard PDF fill the gap for users who need pressure-sensitive ink, measurement tools, and reusable markups across all their devices.
Note: Most workflows in this guide assume an iPad running a current version of iPadOS paired with an Apple Pencil. If you are choosing a Pencil for PDF markup, check compatibility before you buy one.
Apple Pencil changes how PDF markup feels as soon as documents get technical. Finger input works for simple highlighting, but it lacks the precision to place a note accurately on a dense drawing or write legibly in a small comment box.
The Pencil fixes that: low-latency tracking keeps ink where you intend it, pressure sensitivity lets you vary line weight the way you would with a real pen, and palm rejection means you can work through a long review session without babying your hand position.
Not every model delivers all of that, and not every Apple Pencil works with every iPad. Before you buy, confirm your devices work together the way you need them to.
The biggest difference for PDF annotation is pressure sensitivity. Apple Pencil (USB-C) supports precise, low-latency writing and tilt recognition, but stroke thickness remains uniform regardless of how hard you press.
If you want lines that respond to pressure, you'll need Apple Pencil Pro, Apple Pencil (2nd generation), or Apple Pencil (1st generation) paired with a compatible iPad and an app that supports it.
Apple's Markup tool is built into iPadOS and available across Files, Notes, Mail, and most document previews without any additional setup. It covers the basics well, including basic signing, highlighting, handwritten notes, and simple sketching.
If you only work with PDFs occasionally and want a free, built-in option, here's how to use Markup on your iPad.
Start by opening the PDF in an app that supports Markup. Files is the most direct option for documents saved locally or in iCloud Drive, while Notes and Mail work well when the PDF already lives inside a note or message.
The Markup Toolbar is where you'll find all of Apple's annotation tools, including pens, highlighters, erasers, color controls, and selection tools. If it gets in the way while you're working, you can move it to another edge of the screen or temporarily collapse it.
Use the native Markup tools when you need fast handwritten notes or a few arrows on a PDF, or want to highlight important sections. The Pen, Marker, Pencil, and Highlighter tools all work with Apple Pencil, and the color controls let you separate review notes by topic or priority.
Native Markup gives you a few quick correction tools, which are helpful when handwritten notes land in the wrong place or a line crosses the wrong part of a drawing.
Save behavior depends on where the PDF is open:
If you've spent a lot of time annotating a document, it's worth reopening the PDF before moving on. A quick check can help you catch sync issues or confirm that your highlights, notes, and drawings were saved to the correct file.
Apple's Markup tool works well for light annotation. If you need to sign a document, circle a section, add a quick note, or highlight a few passages, you can do it directly from the apps already built into iPadOS. For occasional PDF work, that's often all you need.
The limitations become more noticeable when you're working with PDFs every day. If you review PDFs every day, reuse the same symbols, measure construction drawings, organize annotation sets, or move between iPad, iPhone, Mac, and web, a dedicated PDF markup tool gives you more control.
Drawboard PDF for iPad and iPhone is built for people who want a more complete markup workflow than Apple's native tool provides. The iPad app keeps the familiar pen-on-paper feel, then adds a full Markup Toolbar, reusable markups, measurement tools, signing, and Store+Share sync. Here’s how it works.
Spend a few minutes setting up Drawboard PDF before you start reviewing documents. Getting your account, sync settings, and preferred tools configured upfront makes the actual markup process much smoother.
If you plan to use reusable markups or measurement tools, confirm that your plan includes the features you need on the Drawboard pricing page.
The Markup Toolbar is where most of your work starts in Drawboard PDF. Whether you're handwriting notes, reviewing drawings, adding measurements, or filling out forms, the tools you need are organized in one place so you can switch between them without leaving the document.
Here’s how you can use the toolbar:
Once the toolbar is open, you can:
For drawing-heavy sessions, use the three dots in the top-right corner to choose Viewing Mode, then switch between Docked and Floating. Floating mode lets you move the toolbar around the canvas, while Docked mode keeps it fixed to the top of the screen.
Apple Pencil settings help you separate drawing from navigation. If you want your Pencil to mark up the PDF while your finger scrolls, turn off touch annotation unless you specifically need finger markup.
For the cleanest Pencil workflow, choose Only Draw using the Apple Pencil, so your finger can scroll without adding stray ink.
You can also set this at the iPad level by opening Settings, choosing Apple Pencil, and turning on Only Draw with Apple Pencil. Drawboard's stylus and touch settings explain both options.
If you use Apple Pencil regularly, pressure-sensitive ink is one of the first differences you'll notice in Drawboard PDF.
The Pen tool on the iOS app includes several pen styles, including Standard, Variable, and Calligraphy, but Variable is the one that feels closest to writing with a real pen. With Variable ink, a light touch produces a thinner line, while more pressure creates a heavier stroke.
This is where your hardware matters. Apple Pencil (USB-C) gives you precise ink without the dynamic stroke weight. For the full pressure-sensitive feel, use a compatible Apple Pencil model that supports pressure.
Use shapes and review markups when handwriting alone is too easy to miss. Arrows, clouds, callouts, underlines, and strikethroughs give reviewers a clearer way to point to a specific line, note, issue, or dimension.
Here’s how you can do this on Drawboard PDF:
For architecture, engineering, and construction workflows, the Measure tools can turn the iPad into a field-ready review setup. Use Calibrate first, then apply Measure Length, Poly length, Polygon area, or Rectangle area to check dimensions on a construction drawing.
For more information, check out our guide to measurement and angles article.
Apple Pencil is a natural fit for signatures because you can write directly on the PDF. Drawboard PDF supports signing workflows through its Signature tool, with stored signatures available based on your plan.
1. Open the PDF you need to sign.
2. Choose the Signature tool from the Insert tools.
3. Draw your signature with Apple Pencil or choose a saved signature if you already have one.
4. Place the signature in the correct field, then resize or reposition it as needed.
For a full walkthrough, here’s how to fill and sign a PDF.
If you find yourself adding the same annotations, shapes and lines, text annotations, or callouts over and over, the Markup Library can save you time.
Instead of recreating reusable markups for every document, you can save them once and reuse them across PDFs on iPad, Windows, macOS, and the web. Here’s how it works:
1. Use the Select tool to select the annotation you want to save.
2. When the options panel appears, tap Add on iOS.
3. Open the Markup Library when you want to reuse the saved markup on another PDF.
4. Use tags, sorting, and grouping to keep frequently used markups easy to find.
AEC reviewers can use this for project notes, review stamps, engineering symbols, and repeated drawing comments. Save the markup once, then drop it back onto the next drawing when the same issue appears.
If you switch between devices throughout the day, Store+Share keeps your PDFs and annotations available wherever you left off. You can mark up a PDF on iPad, review it later on Mac or in a browser, and keep your document connected to the same cloud workspace.
1. Save the PDF in Drawboard PDF with Store+Share enabled.
2. Open Drawboard PDF on another supported device.
3. Open the same document from your account.
4. Continue reviewing, adding markups, or sharing from that device.
This is helpful when an iPad works best in the field, while a desktop screen works better for final review. Your team gets a marked-up PDF that can move with the work across iPad, iPhone, Mac, and web.
A few small settings can make PDF markup on iPad much more comfortable, especially during longer review sessions.
Before you spend an hour annotating a document, it's worth checking how Pencil input, save behavior, and workspace settings are configured.
Turn on Only Draw with Apple Pencil if you want to annotate with the Pencil while using your fingers to scroll through the document. This prevents accidental finger strokes while your hand moves around the PDF, especially on long drawings or multi-page documents.
Drawboard PDF for iOS saves versions of documents as you work. If you are working with cloud sync, give the document a moment to finish syncing before you close the app or move to another device.
If your internet connection drops, you can continue working on the document locally and let it sync once you're back online. The app itself doesn’t require an internet connection, so you can continue reviewing and annotating PDFs when the internet drops. This is helpful when you're working on-site or moving between locations with unreliable connectivity.
If you need more screen space while annotating, Drawboard PDF can automatically hide parts of the interface as you draw using the Floating mode.
To activate it, open the additional options from the three-dot menu in the top-right corner and enable Hide Markup Toolbar While Drawing or Hide Properties While Drawing. This gives you more room to work while keeping the toolbar easily accessible when you need it.
Apple Pencil makes marking up PDFs on iPad feel far more natural than tapping through documents with your finger. For occasional annotations, Apple's built-in Markup tools handle the essentials without much setup.
If PDF review is something you do regularly, a dedicated app like Drawboard PDF can make the process faster and more organized with a full Markup Toolbar, measurement tools, Store+Share sync, and pressure-sensitive ink.
The free Basic plan is a good starting point if you want to try Drawboard PDF alongside Apple's built-in tools. As your markup needs grow, whether that's reviewing drawings or managing more complex PDF workflows, you can explore the Pro plans to see what you’re missing out on.
Get started free with Drawboard PDF for iPad.


We are a PDF and collaboration company. We believe that creating more effective connections between people reduces waste.
Our best work has been overtaken by busywork. That’s why we’ve created ways to help people get back to working wonders without any paper in sight.
Drawboard PDF lets you mark up and share with ease, and Drawboard Projects brings collaborative design review to architecture and engineering teams.
At Drawboard, we work our magic so our customers can get back to working theirs.

