
If you store documentation, notes, or plans in Dropbox, you need an easy way to open and annotate PDFs without the download–markup–save–upload cycle.
Drawboard PDF’s Dropbox integration lets you open PDFs from Dropbox, annotate them in Drawboard PDF, and sync changes back to the same file. This helps keep documents up to date and reduces the risk of working from outdated versions.
Here’s how to edit PDFs in Dropbox with Drawboard PDF.
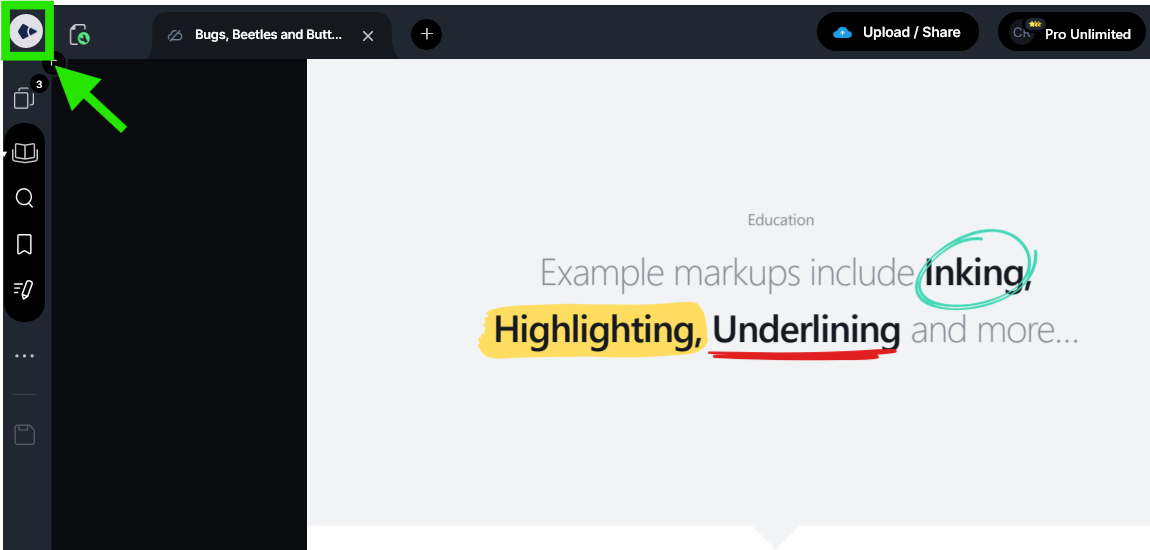
The dashboard is the home screen of Drawboard PDF, where you can view and manage your files.
If you’re opening the app for the first time, you’ll land on the dashboard automatically. If you’re currently working in a document, select the Drawboard icon in the top-left corner to return to it.
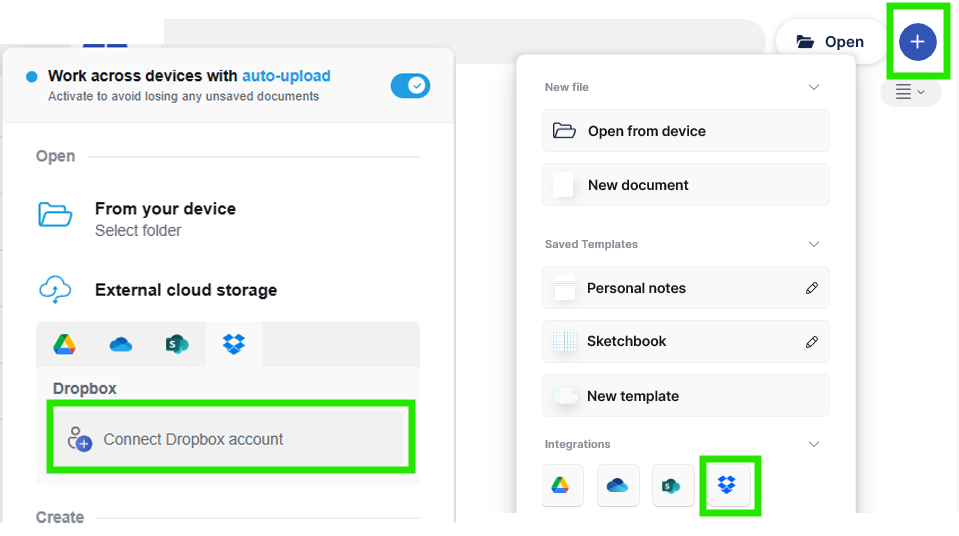
From the dashboard, you can open files from local storage or connected cloud services. This includes Google Drive, OneDrive, SharePoint, and Dropbox.
Select the ‘+’ icon in the top-right corner of the dashboard to view available file sources.
Under “External cloud storage” (or “Integrations” on the Windows app), select the Dropbox icon, then choose ‘Connect Dropbox’ account to begin the authorization process.
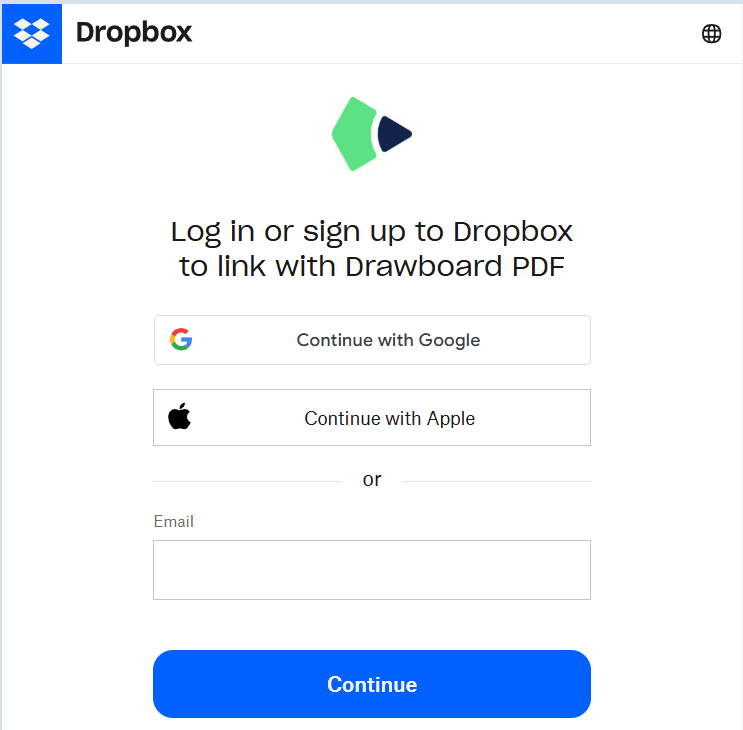
Selecting the Dropbox integration will open your web browser or a pop-up window to the Dropbox sign-in page.
Sign in to your Dropbox account and approve any permission requests. Once complete, you’ll be returned to Drawboard PDF or taken directly to the Dropbox file browser.
After linking your Dropbox account, your Dropbox folders become available directly inside Drawboard PDF. This lets you open and work on files without leaving the app.
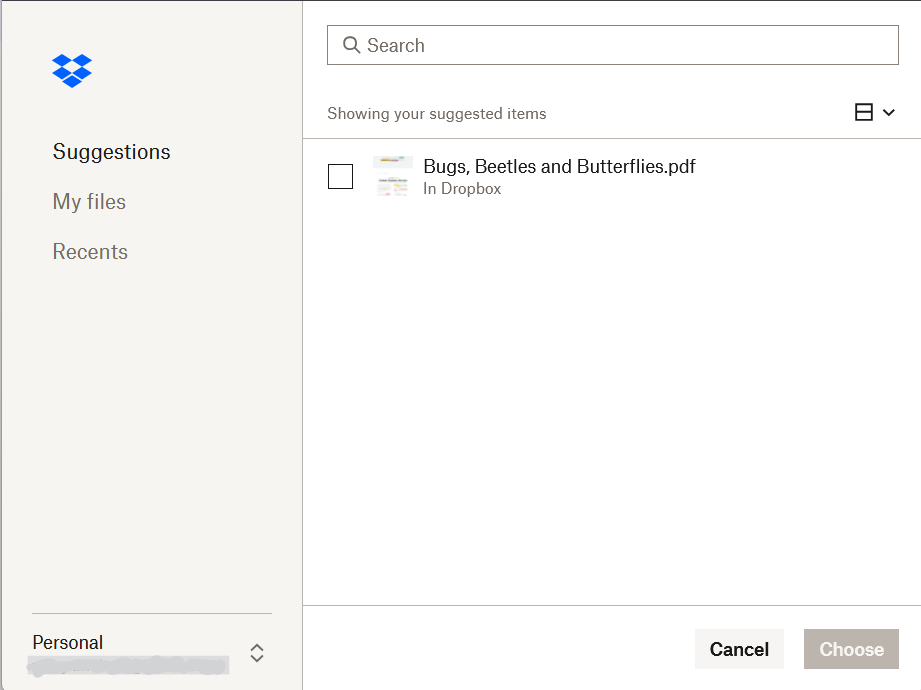
From the dashboard, select the ‘+’ icon again. In the Dropbox section, click or tap your account email (Web) or the Dropbox icon (app) to launch the Dropbox file browser.
Browse through your folders and check the PDFs you want to work on. When you’re ready, click ‘Choose’ to add them to your Dropbox section on the dashboard for quick access.

After you’ve added your desired files, you can start working on them. Use the “All” or “Dropbox” tabs on your dashboard to filter by Dropbox-connected files, then click or tap the file(s) you want to open.
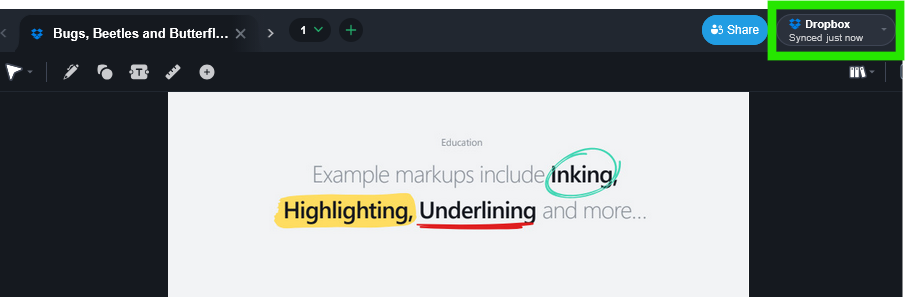
Once they’re added to Drawboard PDF and in the document editor, check the top-right corner of the editor to make sure you have syncing on.
Here, you can change the sync frequency, manually sync the file back to Dropbox, or turn syncing off.
When working on PDFs from Dropbox, Drawboard PDF gives you control over how and when changes are synced back to Dropbox.
This gives you flexibility to sync changes as you work or wait until you’re ready to update the file in Dropbox.
Ready to simplify how you work with PDFs in Dropbox? Start a 14-day free trial of Drawboard PDF and try the integration in your own workflow.
If you’re a student or educator, Drawboard PDF also offers discounted multi-year plans.
If you store documentation, notes, or plans in Dropbox, you need an easy way to open and annotate PDFs without the download–markup–save–upload cycle.
Drawboard PDF’s Dropbox integration lets you open PDFs from Dropbox, annotate them in Drawboard PDF, and sync changes back to the same file. This helps keep documents up to date and reduces the risk of working from outdated versions.
Here’s how to edit PDFs in Dropbox with Drawboard PDF.
The dashboard is the home screen of Drawboard PDF, where you can view and manage your files.
If you’re opening the app for the first time, you’ll land on the dashboard automatically. If you’re currently working in a document, select the Drawboard icon in the top-left corner to return to it.
From the dashboard, you can open files from local storage or connected cloud services. This includes Google Drive, OneDrive, SharePoint, and Dropbox.
Select the ‘+’ icon in the top-right corner of the dashboard to view available file sources.
Under “External cloud storage” (or “Integrations” on the Windows app), select the Dropbox icon, then choose ‘Connect Dropbox’ account to begin the authorization process.
Selecting the Dropbox integration will open your web browser or a pop-up window to the Dropbox sign-in page.
Sign in to your Dropbox account and approve any permission requests. Once complete, you’ll be returned to Drawboard PDF or taken directly to the Dropbox file browser.
After linking your Dropbox account, your Dropbox folders become available directly inside Drawboard PDF. This lets you open and work on files without leaving the app.
From the dashboard, select the ‘+’ icon again. In the Dropbox section, click or tap your account email (Web) or the Dropbox icon (app) to launch the Dropbox file browser.
Browse through your folders and check the PDFs you want to work on. When you’re ready, click ‘Choose’ to add them to your Dropbox section on the dashboard for quick access.
After you’ve added your desired files, you can start working on them. Use the “All” or “Dropbox” tabs on your dashboard to filter by Dropbox-connected files, then click or tap the file(s) you want to open.
Once they’re added to Drawboard PDF and in the document editor, check the top-right corner of the editor to make sure you have syncing on.
Here, you can change the sync frequency, manually sync the file back to Dropbox, or turn syncing off.
When working on PDFs from Dropbox, Drawboard PDF gives you control over how and when changes are synced back to Dropbox.
This gives you flexibility to sync changes as you work or wait until you’re ready to update the file in Dropbox.
Ready to simplify how you work with PDFs in Dropbox? Start a 14-day free trial of Drawboard PDF and try the integration in your own workflow.
If you’re a student or educator, Drawboard PDF also offers discounted multi-year plans.


We are a PDF and collaboration company. We believe that creating more effective connections between people reduces waste.
Our best work has been overtaken by busywork. That’s why we’ve created ways to help people get back to working wonders without any paper in sight.
Drawboard PDF lets you mark up and share with ease, and Drawboard Projects brings collaborative design review to architecture and engineering teams.
At Drawboard, we work our magic so our customers can get back to working theirs.

